Monday, August 31, 2026

How to Clear Tesla 1512876-00-B Airbag Crash by Xtool?

How to Clear Tesla 1512876-00-B Airbag SRS Crash using Xtool step-by-step?


What You’ll Need

  • XTOOL diagnostic tablet with compatible EV diag software (Xtool D9EV, Prodigy, Compass, Compass Master etc)
  • VCI (Vehicle Communication Interface) box
  • OBD (On-Board Diagnostics) cable
  • 12V power supply (e.g., cigarette lighter adapter)
  • Universal jumper cables with labeled ends (ground, 12V, CAN high, CAN low)
  • The Tesla airbag module itself (removed from the vehicle)
Clear Tesla 1512876-00-B Airbag Crash by Xtool 1
Step 1: Hardware Setup

Connect the VCI box
Start by plugging the OBD cable into the VCI box. Then, supply power to the VCI box using a 12V source—a cigarette lighter adapter works perfectly. Press the power button on the VCI box; it will automatically pair with the XTOOL tablet via wireless or Bluetooth connection.

Clear Tesla 1512876-00-B Airbag Crash by Xtool 2

 Clear Tesla 1512876-00-B Airbag Crash by Xtool 3

 Clear Tesla 1512876-00-B Airbag Crash by Xtool 4

Prepare the airbag module
Place the airbag module on your workbench in a specific orientation—exactly as shown in the tool’s wiring diagram. Do not position it any other way, as correct pin alignment depends on this placement.


Step 2: Identify the Correct Part Number

On the tablet, navigate to Component Test and select Airbag Repair (the first option). Choose Tesla from the manufacturer list. Now, locate the physical part number on your airbag module (it is printed on the label, here the SRS part number is 1512876-00-B). Cross-check this number with the tablet’s displayed list to ensure you select the exact match. In the example provided, the matching part number was clearly identified on the screen. 

Clear Tesla 1512876-00-B Airbag Crash by Xtool 5

Clear Tesla 1512876-00-B Airbag Crash by Xtool 6

 Clear Tesla 1512876-00-B Airbag Crash by Xtool 7

 Clear Tesla 1512876-00-B Airbag Crash by Xtool 8

 Clear Tesla 1512876-00-B Airbag Crash by Xtool 9

Step 3: Understand the Wiring Diagram

Before connecting any cables, tap the wiring diagram icon in the top right corner of the tablet. This diagram is critical—it shows exactly which pins on the module correspond to:

  • 12V power supply
  • Ground
  • CAN high
  • CAN low

In this case, there are only four cables to connect, located at specific pins on the module.

Clear Tesla 1512876-00-B Airbag Crash by Xtool 10

Step 4: Connect the Jumper Cables

Use the universal jumper cables that come with your kit. Here is an important practical tip:
If a jumper pin feels loose when inserted, gently press the metal part of the connector with pliers or a small tool. This will tighten the grip so it fits as securely as a new cable.

Now, follow the wiring diagram exactly:

  • Connect the ground cable to its designated pin.
  • Connect the 12V cable to its pin.
  • Connect the CAN high cable to its pin.
  • Connect the CAN low cable to its pin.


Crucial note: The color of the cable insulation is for reference only. Do not rely on color matching. Instead, read the label printed on each cable (e.g., "CAN H", "CAN L", "GND", "12V") to ensure correct connections.

Clear Tesla 1512876-00-B Airbag Crash by Xtool 11

 Clear Tesla 1512876-00-B Airbag Crash by Xtool 12

Step 5: Link to the VCI Box

Once all four jumper cables are firmly attached to the airbag module, connect the other ends to the OBD cable that runs from the VCI box. The order here does not matter as long as each labeled cable goes into the corresponding port on the OBD breakout connector.

Clear Tesla 1512876-00-B Airbag Crash by Xtool 13

Step 6: Perform the Reset on the Tablet

Return to the XTOOL tablet’s main menu. Select the Airbag System option, then choose Special Function. From the submenu, select Clear Collision Records.

The tablet will process the command. Within seconds, a confirmation message appears: "The collision record was cleared successfully."

Clear Tesla 1512876-00-B Airbag Crash by Xtool 14

 Clear Tesla 1512876-00-B Airbag Crash by Xtool 15

 Clear Tesla 1512876-00-B Airbag Crash by Xtool 16

Final Verification

That’s it. The crash data is now erased from the module’s memory. The module can be reinstalled in the vehicle, and the airbag system will function without stored collision codes—provided all physical components (sensors, airbags, seatbelts) are also repaired or replaced as needed.

Key Takeaways for Accuracy


    Always verify the part number before proceeding.

    Follow the wiring diagram precisely—pin location matters more than wire color.

    Ensure tight connections using the pin-tightening tip.

    The reset function is a single-click operation once hardware is correctly set up.

This method, demonstrated with the XTOOL diagnostic tool, turns a potentially confusing repair into a quick, repeatable procedure.

Sunday, July 19, 2026

How to Access Nissan Autoauth SGW Gateway with Xtool?

Since 2020, Nissan has implemented a security gateway system that restricts vehicle control, preventing technicians from performing essential diagnostic functions without proper authorization. This includes clearing diagnostic trouble codes, performing actuator tests, and accessing critical special functions.

XTOOL has integrated AutoAuth services into its diagnostic tools, providing a legitimate and streamlined solution to bypass this security gateway. This article provides a comprehensive, step-by-step guide to unlocking the Nissan security gateway using XTOOL diagnostic equipment.


Understanding the Nissan Security Gateway
What It Does

  • The security gateway acts as a protective barrier between diagnostic tools and the vehicle’s electronic control modules. Its primary purposes include:
  • Blocking unauthorized access to vehicle control systems
  • Preventing code clearing without proper authentication
  • Restricting actuator tests and special functions
  • Protecting against cyber threats and unauthorized programming

The Problem for Technicians

  • Without unlocking the gateway, technicians face significant limitations:
  • Cannot clear diagnostic trouble codes (DTCs)
  • Unable to perform actuator tests
  • Restricted access to special functions
  • Limited ability to complete repairs that require module communication


Compatible devices:

XTOOL diagnostic devices support unlocking the Nissan Security Gateway (SGW) via AutoAuth. Compatible models include the D7D8D9 series, PRODIGY series, Compass series, IP900 and IP919 series, and the X100 MAX series and X100 PAD3. This allows you to perform full diagnostics and bidirectional controls on locked 2023 and newer models.


How to Unlock Nissan Security Gateway with Xtool?

XTOOL has addressed this challenge by integrating AutoAuth authentication services directly into their diagnostic tools. This integration creates a seamless workflow that allows technicians to unlock the security gateway through a few simple steps.

Connectivity Requirements

  • Wi-Fi connection is mandatory during the unlock process
  • The system performs online verification through AutoAuth servers
  • Offline operation is not possible for gateway unlocking


Step 1: Vehicle Connection

Begin by connecting your XTOOL diagnostic tool to the vehicle. The system will:

Initialize the VCI (Vehicle Communication Interface)

Establish communication with the vehicle’s systems

Prepare for diagnostic operations


Step 2: Vehicle Identification

Navigate through the diagnostic menu:

Select Nissan from the main menu

Choose Automatic Detection.

Select Read VIN Code.

The system will automatically read and display the vehicle’s VIN information.

xtool unlock nissan gateway 1

Step 3: Regional Confirmation

Once the VIN is read:

Select USA from the region options.

Confirm the vehicle details displayed on screen.

Verify that all information matches the vehicle being diagnosed.

xtool unlock nissan gateway 2

Step 4: Security Gateway Unlock Prompt

At this point:

A Security Gateway Unlock Prompt will appear on screen.

Ensure Wi-Fi connectivity – this is essential for the authentication process

Tap Yes to proceed with the unlock procedure.
xtool unlock nissan gateway 3

Step 5: AutoAuth Authentication

You will be directed to the AutoAuth login screen:

Enter your username and password.

Tap Log In.

The system will unlock the security gateway online through AutoAuth servers.

Wait for the confirmation message.

xtool unlock nissan gateway 4
xtool unlock nissan gateway 5

Step 6: Proceed to Diagnostics

Once the unlock is successful:

Tap OK to proceed.

Navigate to System Selection.

Select Engine (or other desired control module).

xtool unlock nissan gateway 6

Step 7: Full Diagnostic Access

With the gateway unlocked, you now have complete access to:

  • DTCs (Diagnostic Trouble Codes) – read and clear
  • Live Data – real-time sensor readings
  • Actuator Tests – component activation for testing
  • Special Functions – advanced procedures and adaptations

xtool unlock nissan gateway 7

Step 8: Advanced Special Functions

From the Special Functions menu, technicians can perform critical procedures including:

  • Idle Air Volume Learn – reset idle control adaptations after cleaning or repairs
  • Throttle Position Learn – recalibrate throttle body position sensors
  • Various other manufacturer-specific adaptation procedures


Common Questions and Answers

Q: Why Do I Have to Pay Extra?

This is the most common question from technicians:

A: The fee is charged by AutoAuth for authentication services. Not by XTOOL. And it’s actually the most legitimate and safe way to repair the vehicle.

The authentication fee covers:

  • Secure online verification of credentials
  • Compliance with manufacturer security requirements
  • Legitimate access to vehicle control systems
  • Protection against liability from unauthorized access

Q: Is This Function Global?

A: Basically, AutoAuth mainly targets the North American area. Other regions generally are not restricted yet.

  • North America: Security gateway unlock is required for 2020+ Nissans
  • Other Regions: Restrictions may not currently apply, but technicians should monitor for future changes
  • Technicians outside North America should verify local requirements


Q: I Have Three Devices. Do I Need Three Accounts?

A: AutoAuth charges per shop. So, one shop account normally can bind multiple devices at the same time.

Benefits of this approach:

  • Cost-effective: Single subscription covers multiple tools
  • Convenient: Unified account management
  • Flexible: Multiple technicians can use different tools under one shop account
  • Simple: No need to manage separate credentials for each device

Tuesday, July 14, 2026

Xtool and KC501 Program BMW CAS3+ All Keys Lost

How to read engine ECU ISN code and program BMW CAS3+ all keys lost using xtool x100 pad3/pad elite.


Model example: BMW X1 2014


Procedure:

Step 1: Read Engine ISN code

Remove engine ECU from vehicle.

Connect Xtool VCI with tablet.

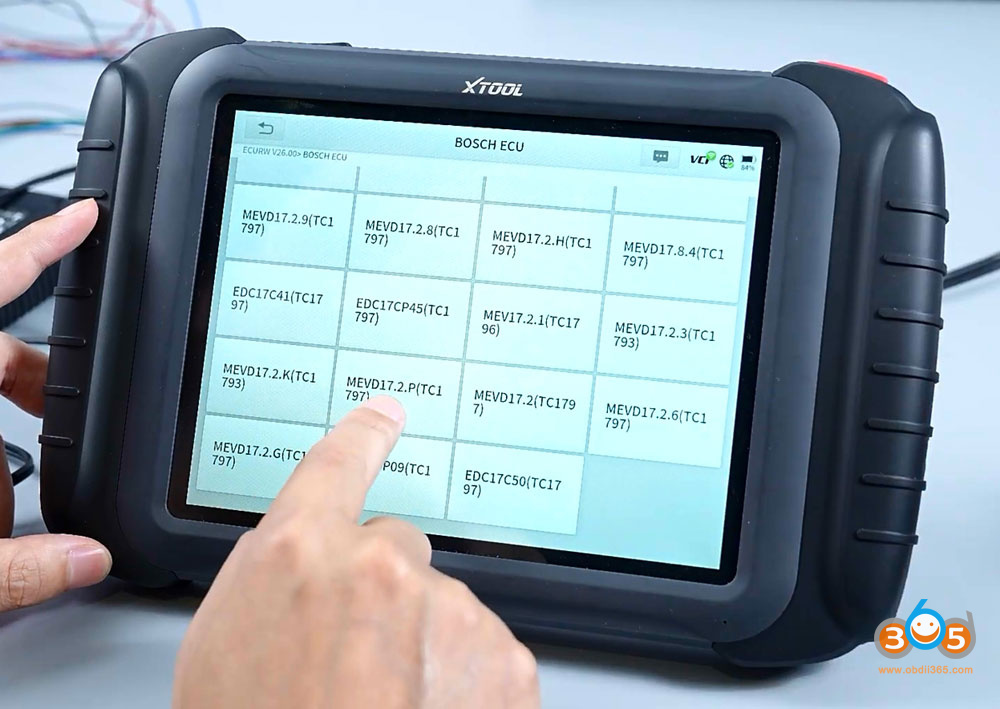
Xtool and KC501 Program BMW CAS3+ All Keys Lost 1

Select Bosch ECU type: MEVD17.2.P

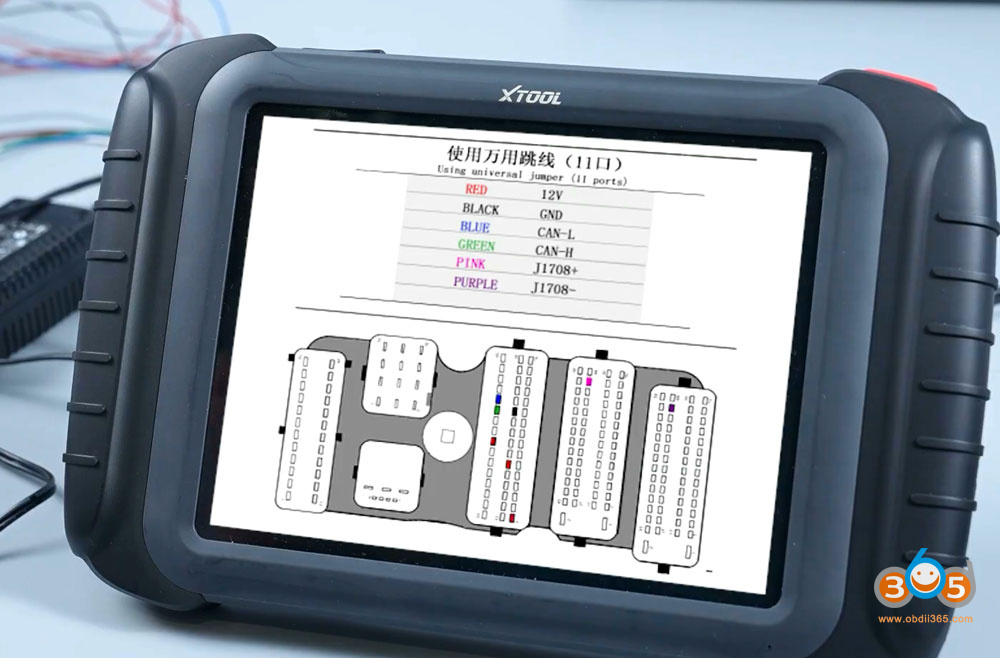
Xtool and KC501 Program BMW CAS3+ All Keys Lost 2

Check bench wiring diagram.

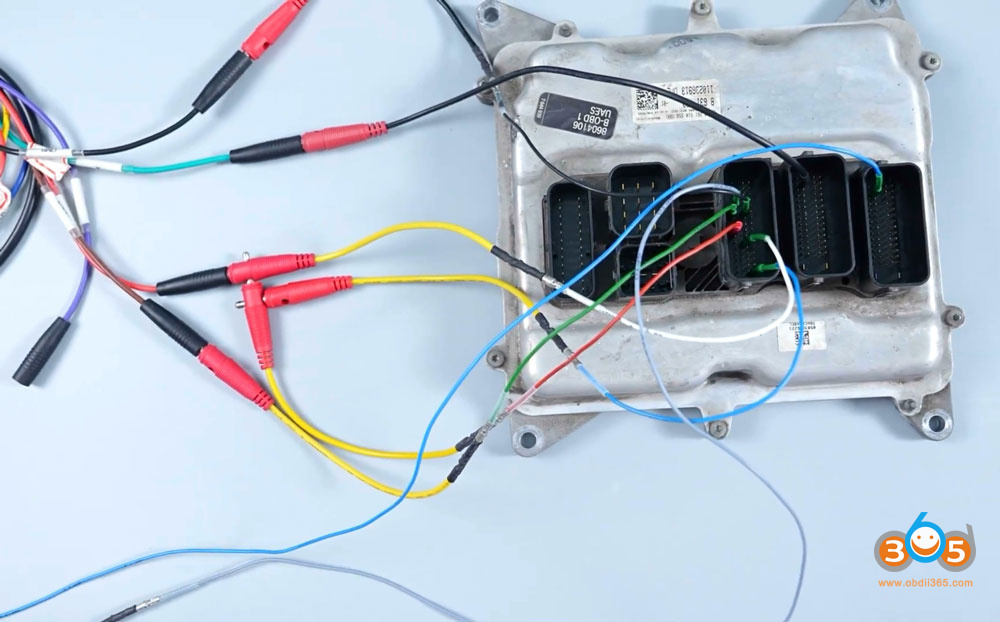
Connect ECU with device via jumper cable.

Xtool and KC501 Program BMW CAS3+ All Keys Lost 3

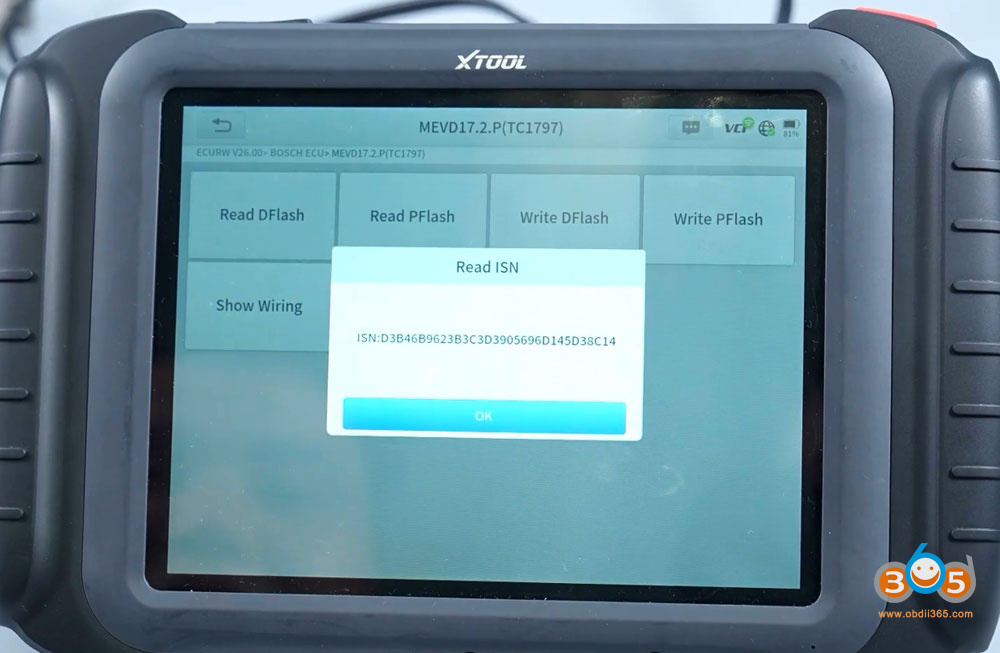
Xtool and KC501 Program BMW CAS3+ All Keys Lost 4

Read and save 32-digit ISN code.

Xtool and KC501 Program BMW CAS3+ All Keys Lost 5

Step 2: Program key via OBD

Install engine ECU back to vehicle.

Connect xtool device with vehicle via OBD socket.

Turn on ignition and hazard warning lights to turn on ignition switch.

Xtool and KC501 Program BMW CAS3+ All Keys Lost 6

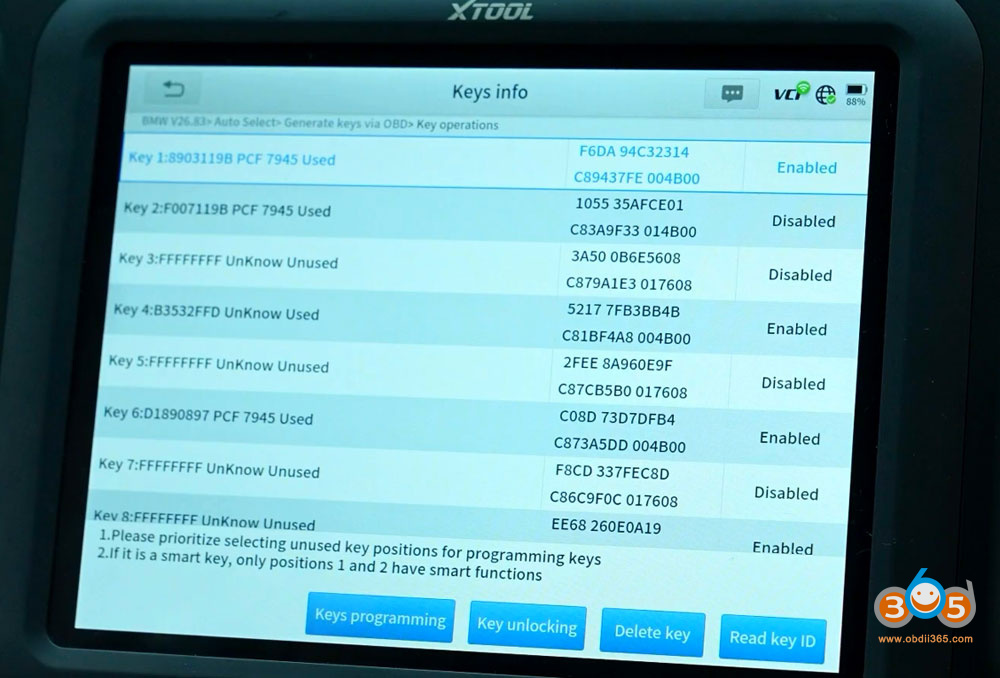
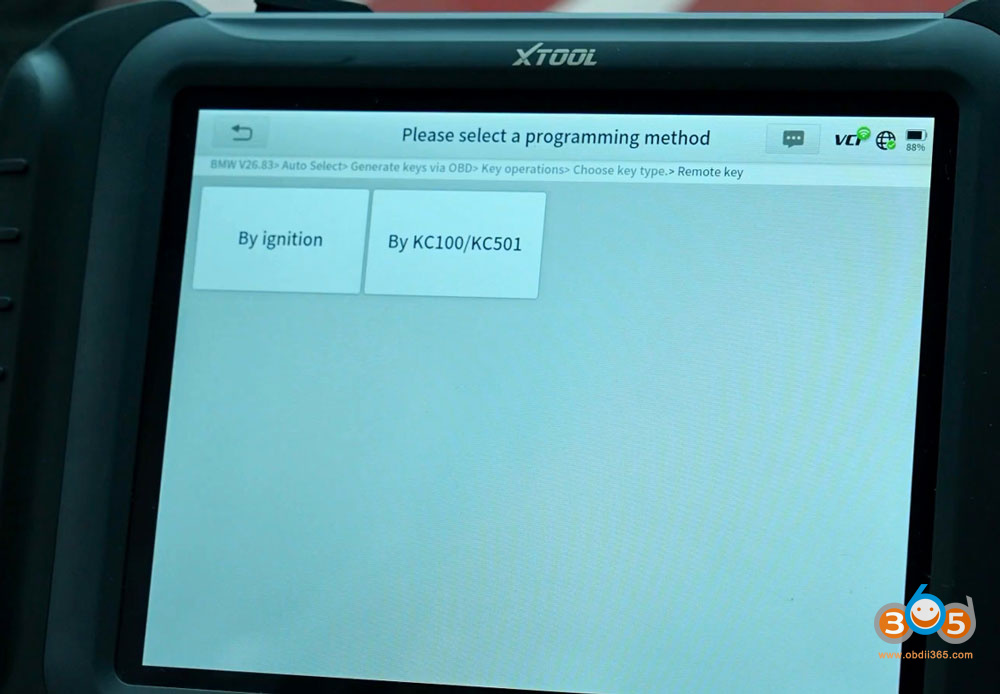
Select Generate keys via OBD-Select key position- select key programming method By KC100/KC501– Remote Key

Xtool and KC501 Program BMW CAS3+ All Keys Lost 7

Xtool and KC501 Program BMW CAS3+ All Keys Lost 8

 Xtool and KC501 Program BMW CAS3+ All Keys Lost 9

 Xtool and KC501 Program BMW CAS3+ All Keys Lost 10

Input 32 digit ISN code to proceed.

Xtool and KC501 Program BMW CAS3+ All Keys Lost 11

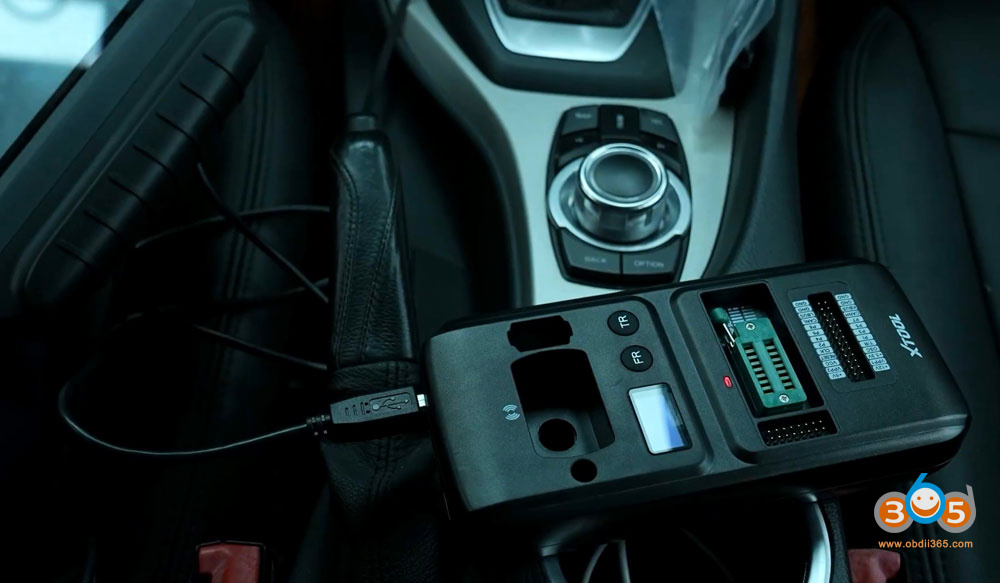
Connect KC501 programmer with Xtool tablet.

Xtool and KC501 Program BMW CAS3+ All Keys Lost 12

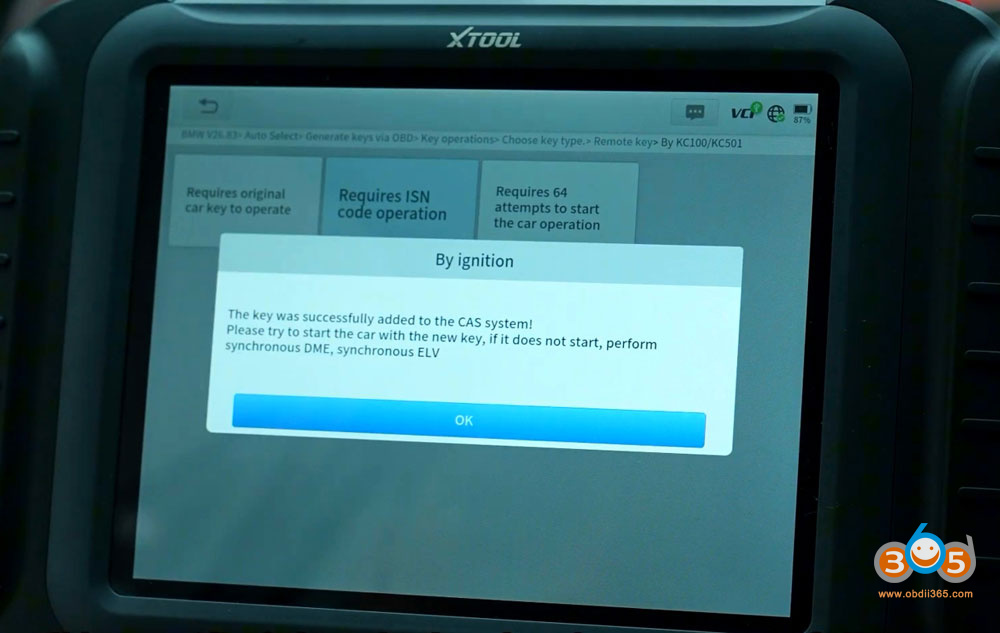
Follow screen prompts unitl key programming finished.

Xtool and KC501 Program BMW CAS3+ All Keys Lost 13